7. CYLINDER HEAD/VALVES ATV 300/250
INSTALLATION
Reverse the "CAMSHAFT REMOVAL"
procedures.
Note the following points:
1. Turn the flywheel so that the "T" mark on
the flywheel aligns with the index mark
on the crankcase.
Keep the round hole on the camshaft
gear facing up and align the punch marks
on the camshaft gear with the cylinder
head surface (Position the intake and
exhaust cam lobes down.) and install the
camshaft onto the cylinder head. (Refer
to the "VALVE CLEARANCE" section
in the chapter 3)
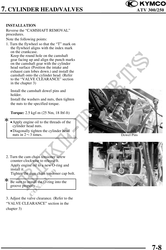
Install the camshaft dowel pins and
holder.
Install the washers and nuts, then tighten
the nuts to the specified torque.
Torque: 2.5 kgf-m (25 Nm, 18 lbf-ft)
· Apply engine oil to the threads of the
cylinder head nuts.
· Diagonally tighten the cylinder head
nuts in 23 times. Dowel Pins
2. Turn the cam chain tensioner screw
counter-clockwise to release it.
Apply engine oil to a new O-ring and
install it.
Tighten the cam chain tensioner cap bolt.
Be sure to install the O-ring into the
groove properly.
3. Adjust the valve clearance. (Refer to the
"VALVE CLEARANCE" section in the
chapter 3)
7-8