mxu 400 Werkstatthandbuch : Seite 135

Microfiches
Image preview

Seite 133

Image preview

Seite 134

Image preview

Seite 136

Image preview

Seite 137

1 5 10 15 20 25 30 35 40 45 50 55 60 65 70 75 80 85 90 95 100 105 110 115 120 125 130 135 137
                                                                                      LCD Gauge

                                                              REPLACING

                                                              To replace the LCD gauge, use the following proce-
                                                              dure.
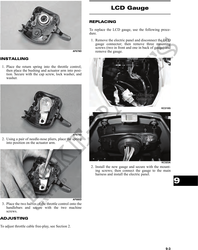
                                                               1. Remove the electric panel and disconnect the LCD
                                                                  gauge connector; then remove three mounting
                                                                  screws (two in front and one in back of gauge) and
                                                     AF678D       remove the gauge.

INSTALLING

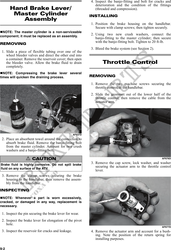
 1. Place the return spring into the throttle control;
    then place the bushing and actuator arm into posi-
    tion. Secure with the cap screw, lock washer, and
    washer.


                                                                                                             KC210G


                                                     AF679D
 2. Using a pair of needle-nose pliers, place the spring
    into position on the actuator arm.


                                                                                                             KC323A
                                                               2. Install the new gauge and secure with the mount-
                                                                  ing screws; then connect the gauge to the main
                                                                  harness and install the electric panel.

                                                                                                                       9

                                                     AF680D
 3. Place the two halves of the throttle control onto the
    handlebars and secure with the two machine
    screws.
ADJUSTING

To adjust throttle cable free-play, see Section 2.


                                                                                                                9-3