mxu 400 Werkstatthandbuch : Seite 74

Microfiches
Image preview

Seite 72

Image preview

Seite 73

Image preview

Seite 75

Image preview

Seite 76

1 5 10 15 20 25 30 35 40 45 50 55 60 65 70 75 80 85 90 95 100 105 110 115 120 125 130 135 137
                 Joining Crankcase
             Halves

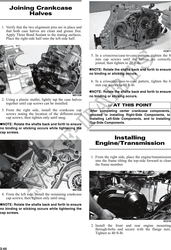
 1. Verify that the two alignment pins are in place and
    that both case halves are clean and grease free.
    Apply Three Bond Sealant to the mating surfaces.
    Place the right-side half onto the left-side half.


                                                                                                            CC871
                                                           5. In a crisscross/case-to-case pattern, tighten the 8
                                                              mm cap screws until the halves are correctly
                                                              joined; then tighten to 21 ft-lb.
                                                           NOTE: Rotate the shafts back and forth to ensure
                                                          no binding or sticking occurs.

                                                           6. In a crisscross/case-to-case pattern, tighten the 6
                                                              mm cap screws to 10 ft-lb.
                                                           NOTE: Rotate the shafts back and forth to ensure
                                                MD1336    no binding or sticking occurs.
 2. Using a plastic mallet, lightly tap the case halves
    together until cap screws can be installed.
                                                                          AT THIS POINT
 3. From the right side, install the crankcase cap        After completing center crankcase components,
    screws noting the location of the different-sized     proceed to Installing Right-Side Components, to
    cap screws; then tighten only until snug.             Installing Left-Side Components, and to Installing
 NOTE: Rotate the shafts back and forth to ensure         Top-Side Components.
no binding or sticking occurs while tightening the
cap screws.
                                                                  Installing
                                                             Engine/Transmission

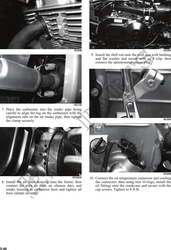
                                                           1. From the right side, place the engine/transmission
                                                              into the frame tilting the top-side forward to clear
                                                              the frame member.


                                                MD1008
 4. From the left side, install the remaining crankcase
    cap screws; then tighten only until snug.
 NOTE: Rotate the shafts back and forth to ensure
no binding or sticking occurs while tightening the
cap screws.

                                                                                                            KC216
                                                           2. Install the front and rear engine mounting
                                                              through-bolts and secure with the flange nuts.
                                                              Tighten to 40 ft-lb.


3-44