17. BATTERY/CHARGING SYSTEM MXU 550EXI/MXU500I
BATTERY
REMOVAL/INSTALLATION
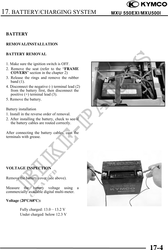
BATTERY REMOVAL
1. Make sure the ignition switch is OFF.
2. Remove the seat (refer to the "FRAME
COVERS" section in the chapter 2)
3. Release the rings and remove the rubber
band (1).
4. Disconnect the negative (-) terminal lead (2)
from the battery first, then disconnect the
positive (+) terminal lead (3).
5. Remove the battery.
Battery installation
1. Install in the reverse order of removal.
2. After installing the battery, check to see if
the battery cables are routed correctly.
After connecting the battery cables, coat the
terminals with grease.
VOLTAGE INSPECTION
Remove the battery cover (see above).
Measure the battery voltage using a
commercially available digital multi-meter.
Voltage (20C/68C):
Fully charged: 13.013.2 V
Under charged: below 12.3 V
17-4