7. CYLINDER/PISTON DINK 50/125
CYLINDER AND PISTON
(DINK 125)
REMOVAL
Remove the cylinder head (refer to
"CYLINDER HEAD" section in the chapter
6).
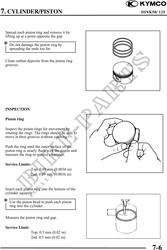
Remove the water hose (1) from the cylinder.
Remove the two cylinder bolts/washers (2).
Remove the cylinder.
Remove the cylinder gasket (4) and dowel
pins (3).
Clean any gasket material from the cylinder
surface.
Remove the piston pin clip (6).
Place a clean shop towel in the crankcase
to keep the piston pin clip from falling
into the crankcase.
Press the piston pin (5) out of the piston and
remove the piston (7).
7-5